Trigger Point Tool - Intro Tutorial
(start here before pain syndrome specific pages)
Benefits of Self Care
Your Trigger Point Tool allows you to work out restrictions in the fascial layers between muscles, ligaments, and tendons that cause movement limitation and pain. Performing "self-care" has three main advantages:
- You can "feel" your body and its Pain Points and Dense Points better than anyone else. This allows you to zero-in on problems areas with great accuracy.
- You are never limited by schedules, insurance, or doctor referrals. Sometimes it's better to have a 5-10 minute specific treatment every day than to go to a long therapy appointment two or three times per week.
- By periodically scanning for new points to work on, you'll prevent any previous issues from returning, but also prevent new problems from developing.
How to Hold the Trigger Point Tool
There are 3 basic holds for the Trigger Point Tool:
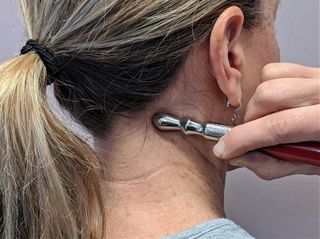
- Handel Hold- full grasp of the tool held up or down in your grip depending on where you are reaching.
- Pen Hold- For fine short strokes, you hold like a pen with your index finger in the finger hollow.
- Palm Hold- Here you hold the tip of the tool in your palm and use palm pressure help increase the pressure of your stroke.
Approach Angles 90, 45, & Flat
There are 3 basic Approach Angles for the Trigger Point Tool:
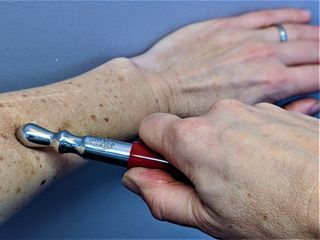
- 90 Degree- allows deep penetration of the point and the most focused access. When you find the "heart" of a Pain or Dense point its good to apply the 90 degree hold with a little discomfort.
- 45 Degree-widens the contact of the tip and will be the most commonly used all around hold.
- Barrel Edge- here the Trigger Point Tool is oriented flat to the tissue like a rolling pin. Good for general warm up and lymphatic drainage.
The 3 Basic Strokes
You want to "grab" and move the tissue with minimal "slip." This allows the deepest "pulling" into the tissues and friction/heat to build up which is what causes the final release (If your skin is really you can use the Myofascial Repair Oil before hand, though too much oil will not allow enough friction to build).
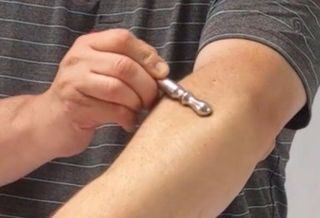
- Cross Friction- (AKA "Cyriax)- named after Dr. Cyriax, this stroke is perpendicular to the fibers. This is commonly used when tendons are being worked on, but also to release the fascial channels of nerves.
- Rotational- (AKA "Stir the Pot") - making a circle stroke that can be either the same diameter around a point, or one that increases and decreases around the point like a vortex.
- Linear - (AKA "Mop the Floor") - stroking along the "grain" of the muscle/ligament/tendon/fascia tissue. This is also called "riving" where you use the tip of the Trigger Point Tool to work between parallel structures, like the many muscles of the forearm.
Pain Point & Dense Point "Release"
Pain Points and Dense Points are both areas where the two layers of fascial are "stuck" together. Pain points are often newer and as a result have pain and inflammation. Dense points are above or below the Pain Point in the Kinetic Chain and often are not painful until deeply palpated or "warmed-up." Dense Points are actually the "sleepers" that are source of the Pain Points... Often, when Dense Points are released, the Pain Points become less tender and heal quickly.
The trick to achieving "release" (when the ground substance of the fascial layers becomes fluid again) is to keep sustained, rhythmic pressure on the point until you feel the tissue "give" (moves more, less tight) and the pain resolve. Often, the stroke will cause the pain to slowly increase until suddenly it's gone. The process takes anywhere for 30 seconds to 3 minutes. You'll have better overall results when you work every Point until release.
*Pardon the guest appearance of Mr. Ant on the background screen.
Connecting the Dots
The "Kinetic Chain" is how the force of movement, lifting, or gravity transfers through the body. You can easily palpate "above," "below," or in a "spiral" away from a Pain Point to find other Pain Points or Dense Points. It is basically just like the game "connect the dots."
Remember that forces move from head to toe through the body, so it is possible for fasica restrictions in the Big Toe to affect the hip or back. Or, for the sacral ligaments to affect neck pain/headache. Hand/Arm pain will always have other points in the shoulder... a very common one being the infraspinatus muscle. As you get better at your own body scans, you will easily pick up the points along the Kinetic Chain that require release. I have also put together a section on "The Usual Suspects," which are the most commonly restricted points in nearly all people.
The Usual Suspects- Top to Bottom
Suboccipital Fascia- connective tissue at the base of the skull, the fascia extends into the back of the head up unto the scalp.
Scalene Muscles- the sides of the neck they cover the major nerve plexus for the arm and become overworked when breathing improperly.
Levator Scapula- the area right between the shoulder blades near the upper part of the shoulder blade. It holds tremendous tension for most people.
Infraspinatus- a rotator cuff muscles that sits on the lower part of the scapula. It is not "weak" as off ten suspected, but over-lengthened due to rolled shoulders.
Triceps insertion- movement restriction in this area leads to elbow pain, usually in the top of the forearm.
Lumbosacral fascia- the thick tissue above pelvic crest, just below the "small" of the back. Extends down around the triangular shaped sacrum bone.
Piriformis- Deep in the "butt," under the Gluteas Maxiumus muscle. Overlies the sciatic nerve and can be a contributor to back, hip, and leg pain.
Fibularis- the muscles along the side of the leg below the knee are chronically tight and uncoordinated because we wear shoes and do not "challenge" the ankle and foot. bones.
Plantar Fascia- keep this area pliable and free from restrictions to prevent many lower extremity problems
Big Toe- when you walk the gait cycle is initiated at the big toe, so always keep the big toe joints free from Dense Points.
Part 1
Part 2
Treatment Duration & Frequency
Each point should receive no more than 3 minutes. In the beginning, it is best to keep the time treating one Pain Point or Dense Point to under a minute and a half. You will need to learn your tissue tolerance to this kind of work. Overly aggressive self treatment can cause soreness, leave a bruise, or irritate the skin
Every other day is a good treatment frequency if you are working intensely on points. As, you release areas of the body it will become easier to maintain your progress with less work.
Cautions
- Learn your tissue tolerance by being conservative with pressure and length of treatment in the begining.
- Do not work over sores, open wounds, or recent surgical scars.
- Don't hesitate to ask your chiropractor, physical therapist, or massage professional for tips and guidance with your myofasical points.
- If your condition is not improving, seek guidance from a health professional.


